How to Set Up and Verify Your Domain in Mailgun: A Step-by-Step Guide
Overview
This comprehensive guide will walk you through the process of adding and verifying a domain in Mailgun, an essential step before you can start sending emails through their platform.
Domain verification is crucial as it enables open and click tracking, helps mitigate spam, and ensures that only you and your organization can send emails from your domain.
If your domain is already hosted with a provider, you'll need to access your account to modify the DNS records. If you don't have a domain host yet, you can create an account with providers like Cloudflare, Google Domains, GoDaddy, or Namecheap.
Pro-Tip: We provide specialized guides for popular DNS hosting providers in Step 2.
Step 1: Add Your Domain to Mailgun
If you've already added your domain, you can skip to step 2.
Prefer videos? This section includes a video walkthrough demonstrating how to add a domain to Mailgun and configure DNS records with a hosting provider.
[INSERT VIDEO SCREENSHOT HERE]
Before verifying a domain, you need to add it to Mailgun by following these steps:
- Log in to the Mailgun Control Panel
- In the left-hand navigation pane, click the Sending option to expand its suboptions
- Click the Domains suboption
When choosing a domain, we recommend using a subdomain (e.g., mail.yourdomain.com) for better email deliverability. Using just your domain name is usually acceptable as well.
After adding your domain, you'll be directed to a screen asking you to add DNS records. Keep this screen open for the next step.
Step 2: Add DNS Records to Your Hosting Provider
If your DNS provider is listed below, you can use our specialized guides:
You'll need to add several types of DNS records. We'll explain each one individually so you understand how to add them to your DNS hosting provider. Note that the exact process may vary slightly depending on your specific DNS host.
TXT Records
The first records Mailgun requires are TXT records. You'll need to add two separate TXT records, one for SPF and one for DKIM. These are essential for sending and receiving email with Mailgun.
Note: If you already have an existing SPF record for this root domain, you cannot add another SPF record.
Instead, you will insert the value include:mailgun.org into your existing SPF record. Ensure this value is placed somewhere after v=spf1 and somewhere before ~all. Also, ensure this value has one space character to its left and one space character to its right.
For example, v=spf1 include:domain1.com include:mailgun.org include:domain3.com ~all
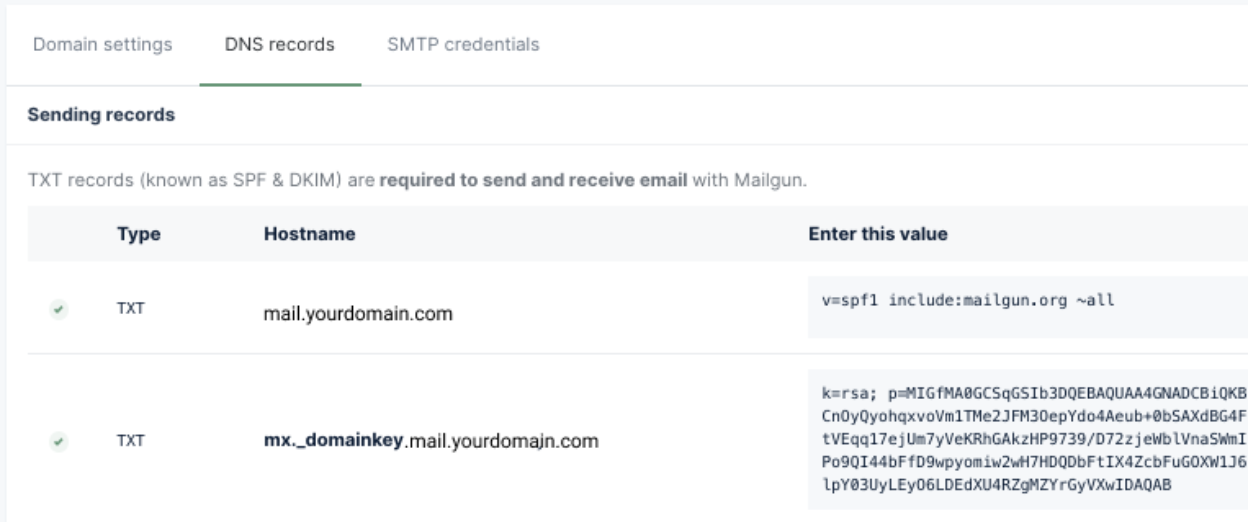
If using a subdomain:
- Add a new TXT record with
mail.yourdomain.comas the hostname (some providers may only require you to entermail) - Enter the value provided by Mailgun
- Leave TTL as the default option
If using the root domain:
- Most providers accept
@as the hostname when creating DNS records for the root domain
After adding the first record, add another TXT record for mx._domainkey.mail.yourdomain.com. Some providers like Cloudflare may only show the subdomain portion.
MX Records
Next, you need to add two separate MX records:
- Use
mail.yourdomain.comas the hostname
10

CNAME Record
Finally, you need to add a CNAME record, which enables Open and Click tracking. This is highly recommended to gain valuable insights into your email performance.
Add the CNAME with email.mail.yourdomain.com as the hostname and the value provided by Mailgun.
Step 3: Wait for DNS Propagation (24-48 Hours)
DNS changes can take up to 24-48 hours to propagate across the internet. In our experience, it usually happens faster, but don't be discouraged if verification isn't immediate.
When everything is set up correctly, you'll receive a confirmation email from Mailgun:
If you're impatient, you can use the 'Check DNS Records Now' button on the DNS Settings page to verify your setup manually.
Need Support?
If you encounter any issues during the setup process, Mailgun's support team is available to assist you. You can reach out through their support portal or check their comprehensive documentation for additional guidance from here.
Related Articles
How to Set Up Mailgun Integration in Logistifie
Once you've successfully set up and verified your domain in Mailgun, you will receive a Private API Key and a Domain Name. These credentials need to be configured within Logistifie to enable email functionalities. Follow the steps below to integrate ...⚙️ Complete Guide to the Settings Panel in Logistifie Dispatch System
The Settings section in the Logistifie Dispatch System is where you configure your core system preferences — everything from currency and timezone to invoicing behavior and branding. Whether you're just getting started or fine-tuning your dispatch ...Google Maps APIs Setup Guide for Logistifie Account
📽️ Video Walkthrough: Step-by-Step Video Guide Click Here 1. Sign Up for Google Cloud Platform (GCP) Go to Google Cloud Console. Click Get Started for Free. Sign in with your Google account or create a new one. Agree to the terms of service and ...How to Set Up Google APIs for Location Services: Distance Calculation, Geocoding, Journey Pricing, Address Suggestions and Map Display
This comprehensive guide will walk you through setting up the Google Maps Platform APIs to enable essential location features in your application including distance calculations, geocoding, journey pricing, address autocomplete, and interactive map ...Guide to Setup Logistifie Dispatch System - How to Add a New Coverage Zone in Logistifie Dispatch System
?️ How to Add a New Coverage Zone in Logistifie Adding coverage zones allows you to define service areas on the map where your fleet operates. Here's a step-by-step guide to help you create a new coverage zone in the Logistifie platform. ...